
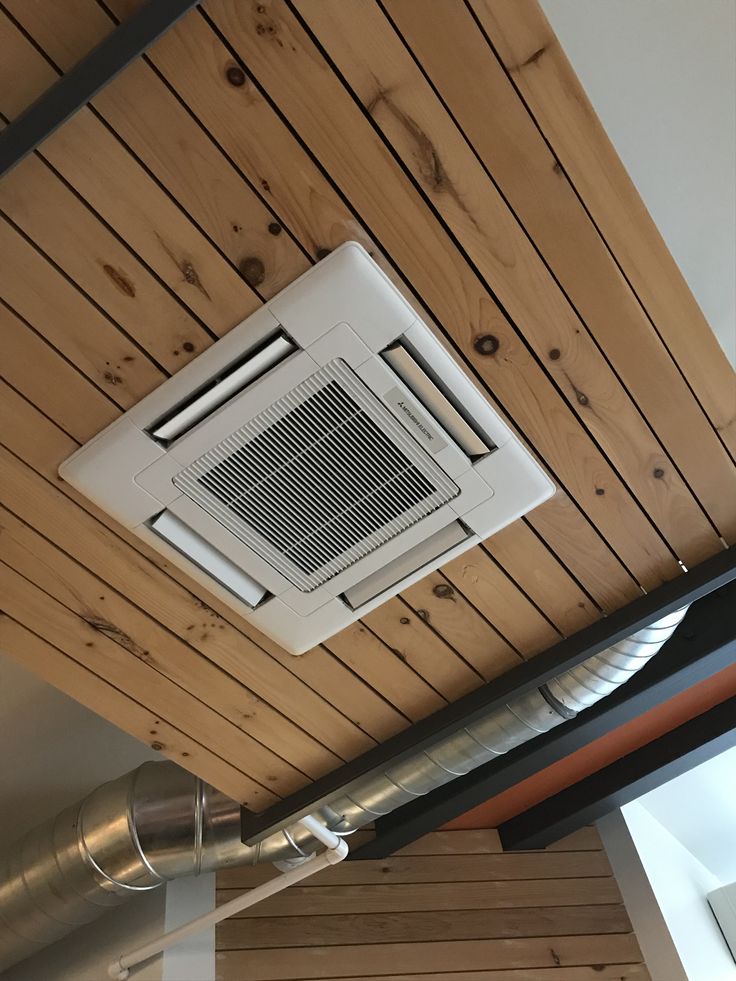
Product
Ceiling cassette installation
Ksh 169,999
Ceiling cassette installation, preventive maintenance,Air conditioner installation,Air conditioner repair maintenance
Prefer a formal quotation? Request a quote
Description
A ceiling cassette installation is the process of mounting a flush-fit HVAC indoor unit inside a ceiling void to provide efficient, space-saving, and multi-directional airflow.AI Mode
All
Images
Videos
News
Maps
Books
Finance
A ceiling cassette installation involves mounting an HVAC indoor unit flush inside a ceiling cavity to distribute conditioned air evenly across a space. Because the main body sits completely hidden within the ceiling void, it is a highly space-saving and aesthetically clean cooling solution.
YouTube
+3
The complete physical installation process breaks down into the following key phases:
1. Site Assessment & Ceiling Preparation
Location Mapping: The indoor unit is ideally centered in the room to allow for optimal four-way airflow.
Ferguson Home
Clearance Evaluation: Installers verify that the ceiling void has adequate vertical clearance (typically 10 to 12 inches minimum) to fit the unit's body.
Ferguson Home
Cutting the Opening: A paper layout template provided by the manufacturer is taped to the ceiling to mark exact dimensions. Installers move any insulation away and carefully cut through the drywall or drop-ceiling tiles.
YouTube
·Ductless Plus HVAC
+2
2. Mounting the Indoor Unit
Structural Support: Installers secure threaded hanging bolts (all-thread) into the joists or overhead concrete slab using anchors or L-brackets.
YouTube
·Forge Space
+2
Hanging the Cassette: The main body of the cassette is lifted into the ceiling cavity and bolted tightly to the suspension rods.
YouTube
+2
Precision Leveling: The unit must be perfectly level. If it is tilted incorrectly, the internal condensate drip pan can overflow and cause water damage.
www.mcool.co.ke
+2
3. Piping, Drainage, and Electrical Connections
Refrigerant Line Sets: Copper lines carrying refrigerant are routed from the outdoor condenser, through the ceiling cavity, and connected to the high and low-pressure ports on the cassette.
Condensate Drainage: Ceiling cassettes feature a built-in lift pump to discharge moisture. Installers connect a rigid PVC drain line that slopes downward to carry the water away safely to the building's exterior.
Control and Power Wiring: Electrical lines and communication cables are fed into the cassette’s internal control box to link it to both the main power supply and the outdoor condenser.
4. Finishing the Grille and Panel
Attaching the Panel: Once the core unit is fixed and wired, a decorative, low-profile outer grille panel is snapped or screwed onto the face of the unit.
Sealing: The panel is adjusted to sit completely flush against the finished ceiling sheetrock, compressing its built-in foam insulation to prevent conditioned air from escaping into the ceiling void.
5. System Commissioning
Vacuum and Leak Tests: The refrigerant lines are vacuum-pumped to extract moisture and checked to ensure there are no pressure leaks.
Test Run: The system is powered on to verify fan speeds, ensure the drainage pump functions without spilling, and confirm even multi-directional airflow.
YouTube
·Forge Space
+2
Are you looking to install a ceiling cassette in a residential home or a commercial property? If you can share the ceiling type (e.g., standard drywall vs. a drop ceiling grid), I can provide more specific framing or clearance recommendations.
A ceiling cassette installation is the process of mounting a flush-fit HVAC indoor unit inside a ceiling void to provide efficient, space-saving, and multi-directional airflow.
The process is summarized into five core stages:
Preparation: Selecting a central location, verifying vertical clearance inside the ceiling, and cutting an exact opening using a manufacturer template.
Mounting: Securing threaded suspension rods into the structural floor joists and lifting the unit's main body to hang perfectly level.
Connections: Routing and attaching the copper refrigerant lines, communication wiring, and power cables from the outdoor unit.
Drainage Setup: Hooking up the internal condensate lift pump to a sloped PVC drain line to safely remove moisture.
Finishing & Testing: Attaching the decorative outer grille panel flush against the ceiling, vacuum-testing the lines, and running the system to confirm proper airflow and drainage.
Are you hiring a contractor for this project, or are you looking for specific DIY framing details? Let me know if you need help with clearance requirements or cost estimates.
Having a ceiling cassette in an office offers significant advantages for comfort, aesthetics, and productivity.
Here are the main benefits of using a ceiling cassette in an office environment:
🌟 Key Advantages
Uniform Air Distribution: Unlike traditional wall units that blow air in one direction, ceiling cassettes feature four-way airflow. They distribute conditioned air evenly across the entire room, eliminating uncomfortable hot or cold spots for employees.
Maximum Space Saving: Because the main mechanical body is hidden completely inside the ceiling void, it frees up valuable wall and floor space. This allows for flexible desk layouts, filing cabinet placement, and clean office aesthetics.
Quiet Operation: Office productivity requires a quiet environment. Ceiling cassettes house their loudest components (the compressor and condenser) outside the building, making the indoor fan incredibly quiet and non-disruptive during meetings or focused work.
Aesthetic Appeal: The only visible part of the unit is a slim, low-profile decorative grille that sits flush against the ceiling. It blends seamlessly into modern office decor and works perfectly with standard commercial drop-ceilings.
High Energy Efficiency: Many ceiling cassettes utilize advanced inverter technology to adjust cooling speeds precisely. This drastically reduces energy consumption, leading to lower utility bills for the business.
Built-in Drainage Pumps: Because they sit high up, these units come equipped with internal lift pumps to safely pump away condensation moisture. This reduces the risk of indoor leaks that could damage expensive office electronics or documents.AI Mode
All
Images
Videos
News
Maps
Books
Finance
A ceiling cassette installation involves mounting an HVAC indoor unit flush inside a ceiling cavity to distribute conditioned air evenly across a space. Because the main body sits completely hidden within the ceiling void, it is a highly space-saving and aesthetically clean cooling solution.
YouTube
+3
The complete physical installation process breaks down into the following key phases:
1. Site Assessment & Ceiling Preparation
Location Mapping: The indoor unit is ideally centered in the room to allow for optimal four-way airflow.
Ferguson Home
Clearance Evaluation: Installers verify that the ceiling void has adequate vertical clearance (typically 10 to 12 inches minimum) to fit the unit's body.
Ferguson Home
Cutting the Opening: A paper layout template provided by the manufacturer is taped to the ceiling to mark exact dimensions. Installers move any insulation away and carefully cut through the drywall or drop-ceiling tiles.
YouTube
·Ductless Plus HVAC
+2
2. Mounting the Indoor Unit
Structural Support: Installers secure threaded hanging bolts (all-thread) into the joists or overhead concrete slab using anchors or L-brackets.
YouTube
·Forge Space
+2
Hanging the Cassette: The main body of the cassette is lifted into the ceiling cavity and bolted tightly to the suspension rods.
YouTube
+2
Precision Leveling: The unit must be perfectly level. If it is tilted incorrectly, the internal condensate drip pan can overflow and cause water damage.
www.mcool.co.ke
+2
3. Piping, Drainage, and Electrical Connections
Refrigerant Line Sets: Copper lines carrying refrigerant are routed from the outdoor condenser, through the ceiling cavity, and connected to the high and low-pressure ports on the cassette.
Condensate Drainage: Ceiling cassettes feature a built-in lift pump to discharge moisture. Installers connect a rigid PVC drain line that slopes downward to carry the water away safely to the building's exterior.
Control and Power Wiring: Electrical lines and communication cables are fed into the cassette’s internal control box to link it to both the main power supply and the outdoor condenser.
4. Finishing the Grille and Panel
Attaching the Panel: Once the core unit is fixed and wired, a decorative, low-profile outer grille panel is snapped or screwed onto the face of the unit.
Sealing: The panel is adjusted to sit completely flush against the finished ceiling sheetrock, compressing its built-in foam insulation to prevent conditioned air from escaping into the ceiling void.
5. System Commissioning
Vacuum and Leak Tests: The refrigerant lines are vacuum-pumped to extract moisture and checked to ensure there are no pressure leaks.
Test Run: The system is powered on to verify fan speeds, ensure the drainage pump functions without spilling, and confirm even multi-directional airflow.
YouTube
·Forge Space
+2
Are you looking to install a ceiling cassette in a residential home or a commercial property? If you can share the ceiling type (e.g., standard drywall vs. a drop ceiling grid), I can provide more specific framing or clearance recommendations.
A ceiling cassette installation is the process of mounting a flush-fit HVAC indoor unit inside a ceiling void to provide efficient, space-saving, and multi-directional airflow.
The process is summarized into five core stages:
Preparation: Selecting a central location, verifying vertical clearance inside the ceiling, and cutting an exact opening using a manufacturer template.
Mounting: Securing threaded suspension rods into the structural floor joists and lifting the unit's main body to hang perfectly level.
Connections: Routing and attaching the copper refrigerant lines, communication wiring, and power cables from the outdoor unit.
Drainage Setup: Hooking up the internal condensate lift pump to a sloped PVC drain line to safely remove moisture.
Finishing & Testing: Attaching the decorative outer grille panel flush against the ceiling, vacuum-testing the lines, and running the system to confirm proper airflow and drainage.
Are you hiring a contractor for this project, or are you looking for specific DIY framing details? Let me know if you need help with clearance requirements or cost estimates.
Having a ceiling cassette in an office offers significant advantages for comfort, aesthetics, and productivity.
Here are the main benefits of using a ceiling cassette in an office environment:
🌟 Key Advantages
Uniform Air Distribution: Unlike traditional wall units that blow air in one direction, ceiling cassettes feature four-way airflow. They distribute conditioned air evenly across the entire room, eliminating uncomfortable hot or cold spots for employees.
Maximum Space Saving: Because the main mechanical body is hidden completely inside the ceiling void, it frees up valuable wall and floor space. This allows for flexible desk layouts, filing cabinet placement, and clean office aesthetics.
Quiet Operation: Office productivity requires a quiet environment. Ceiling cassettes house their loudest components (the compressor and condenser) outside the building, making the indoor fan incredibly quiet and non-disruptive during meetings or focused work.
Aesthetic Appeal: The only visible part of the unit is a slim, low-profile decorative grille that sits flush against the ceiling. It blends seamlessly into modern office decor and works perfectly with standard commercial drop-ceilings.
High Energy Efficiency: Many ceiling cassettes utilize advanced inverter technology to adjust cooling speeds precisely. This drastically reduces energy consumption, leading to lower utility bills for the business.
Built-in Drainage Pumps: Because they sit high up, these units come equipped with internal lift pumps to safely pump away condensation moisture. This reduces the risk of indoor leaks that could damage expensive office electronics or documents.
Are you choosing a system for a large open-plan office or a private conference room? If you have an approximate square footage, I can help you determine the capacity size you might need.
A ceiling cassette is highly versatile and can be installed in any room with a finished ceiling structure that has a hidden void directly above it.
Here are the ideal locations and structural environments where you can install a ceiling cassette:
🏠 Residential Spaces
Open-Concept Living Areas: Perfect for large, combined living rooms, dining rooms, and kitchens where wall space is limited by large windows or cabinetry.
Master Bedrooms: Ideal for centering over the bed space to provide quiet, gentle, draft-free air distribution.
Home Offices & Studios: Keeps the workspace clear of bulky floor or wall equipment while maintaining a quiet environment for focus.
🏢 Commercial & Public Spaces
Offices & Conference Rooms: Blends seamlessly into standard commercial drop-ceilings, ensuring even cooling over desks and boardroom tables.
Retail Stores & Boutiques: Frees up valuable wall space for product displays, clothing racks, and shelving.
Restaurants & Cafes: Keeps diners comfortable by distributing air evenly, avoiding cold drafts directly onto guest tables.
Classrooms & Lecture Halls: Provides high-capacity cooling without creating disruptive background noise for students.
🔨 Structural Requirements (Where it is physically possible)
To install a ceiling cassette, the architecture must meet the following criteria:
Adequate Ceiling Cavity: There must be an empty space (void) between the visible ceiling and the roof or floor above, typically measuring at least 10 to 12 inches deep.
T-Bar Drop Ceilings (Suspended Ceilings): Highly ideal. Standard 2x2 foot or 2x4 foot grid ceilings allow the unit to drop perfectly into place of a standard tile.
Drywall/Sheetrock Ceilings: Completely possible, provided there is enough vertical clearance and installers can run lines between the structural wooden or steel joists.